This page contains instructions for installing an on-premise RLM server license. View the tutorial video or refer to the text-based instructions below. The process is the same for both Barracuda Virtual Reactor and Arena-flow.
The instructions below assume that you have already downloaded and installed the On-Premise RLM Server Installation Files.
| Linux Tutorial | Windows Tutorial | |
| Youtube | Youtube |
To install an on-premise RLM server license file, follow these steps:
- Download and save the RLM license file attached to the email you received from CPFD. Download the file onto the RLM server, not the RLM client computer(s). The license file only needs to be installed on the RLM server. It does not need to be installed on client machines.
- Copy the license file to the following location depending on the OS of your license server:
- Linux: /usr/local/bin/reprise/
Notes:- The location above is the default path to the reprise folder. If you changed your folder from the default path, copy the license to the appropriate folder on your system.
- You will need root permission to copy the license file into the reprise folder.
- If you are using a terminal to copy the license file, the typical commands to use are:
su
<Enter root password>
cp <license file> /usr/local/bin/reprise/ where <license file> is the RLM license file name.
- Windows: C:\Program Files\CPFD\Reprise
Notes:- The location above is the default path to the reprise folder. If you changed your folder from the default path, copy the license to the appropriate folder on your system.
- Windows Explorer will ask for administrator permission to copy a file into any directory inside C:\Program Files.
- Linux: /usr/local/bin/reprise/
- On the RLM server, open a web browser to http://127.0.0.1:5054 which will bring up the Reprise License Server Administration web interface.
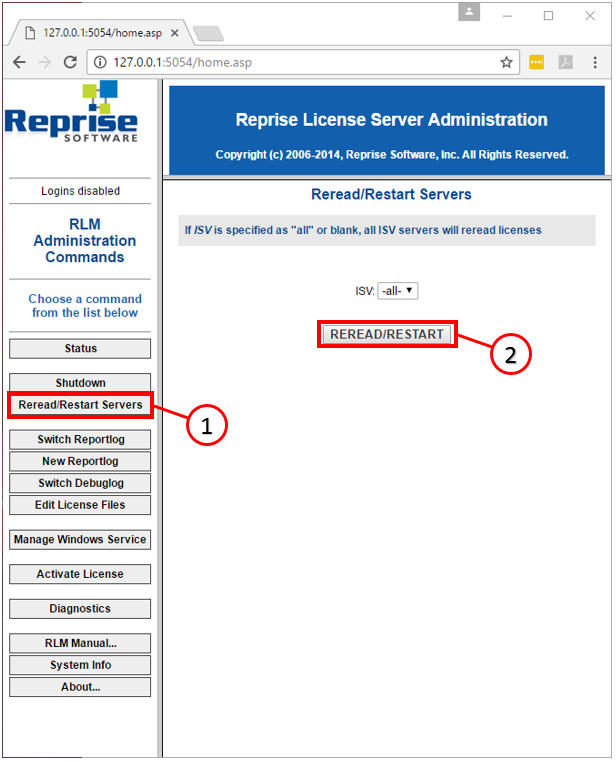
- Click Reread/Restart Servers, then REREAD/RESTART.
.
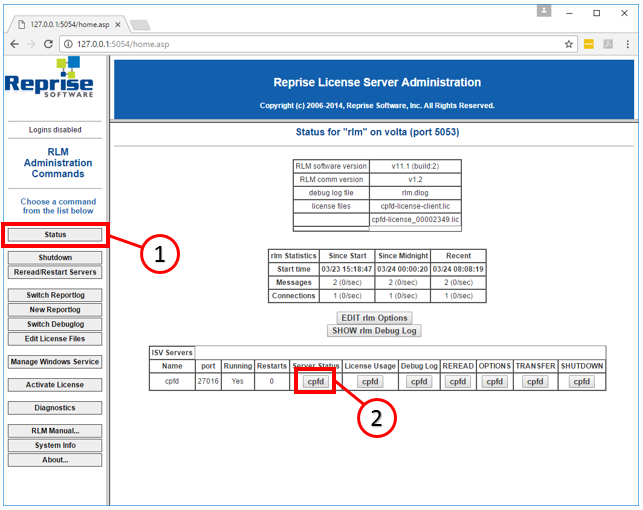
- Click Status, and then click the “cpfd” button in the “Server Status” column.
.
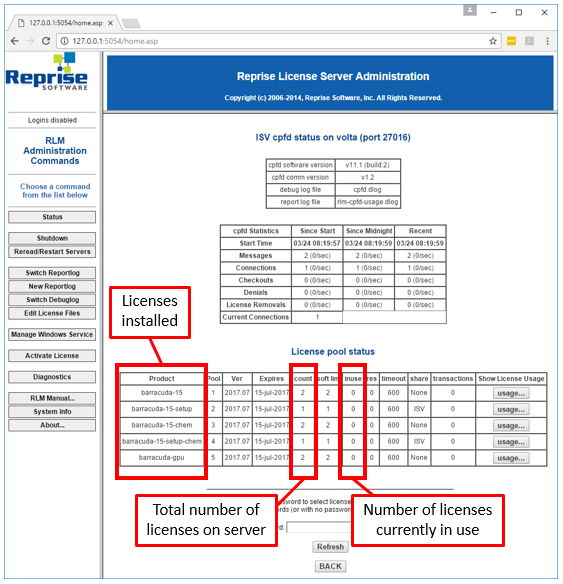
.
- Verify that the correct licenses are listed in the “License pool status” table. Assuming that everything worked correctly, your new RLM licenses are now ready to be checked out by RLM client computer(s).
If the RLM license you received is a renewal license, your RLM client computer(s) are probably configured already to check out licenses from the RLM server. If so, the client computer(s) will automatically check out the renewed license(s) from the RLM server. No further action is needed for the RLM license installation, and you can continue using the software as normal.
If this is your first time installing the software and configuring an on-premise RLM server, you will need to point each client computer to the RLM server in order to check out licenses.

